Inventory
The Inventory is the heart of Turbo EA. Here all cards (components) of the enterprise architecture are listed: applications, processes, business capabilities, organizations, providers, interfaces, and more.
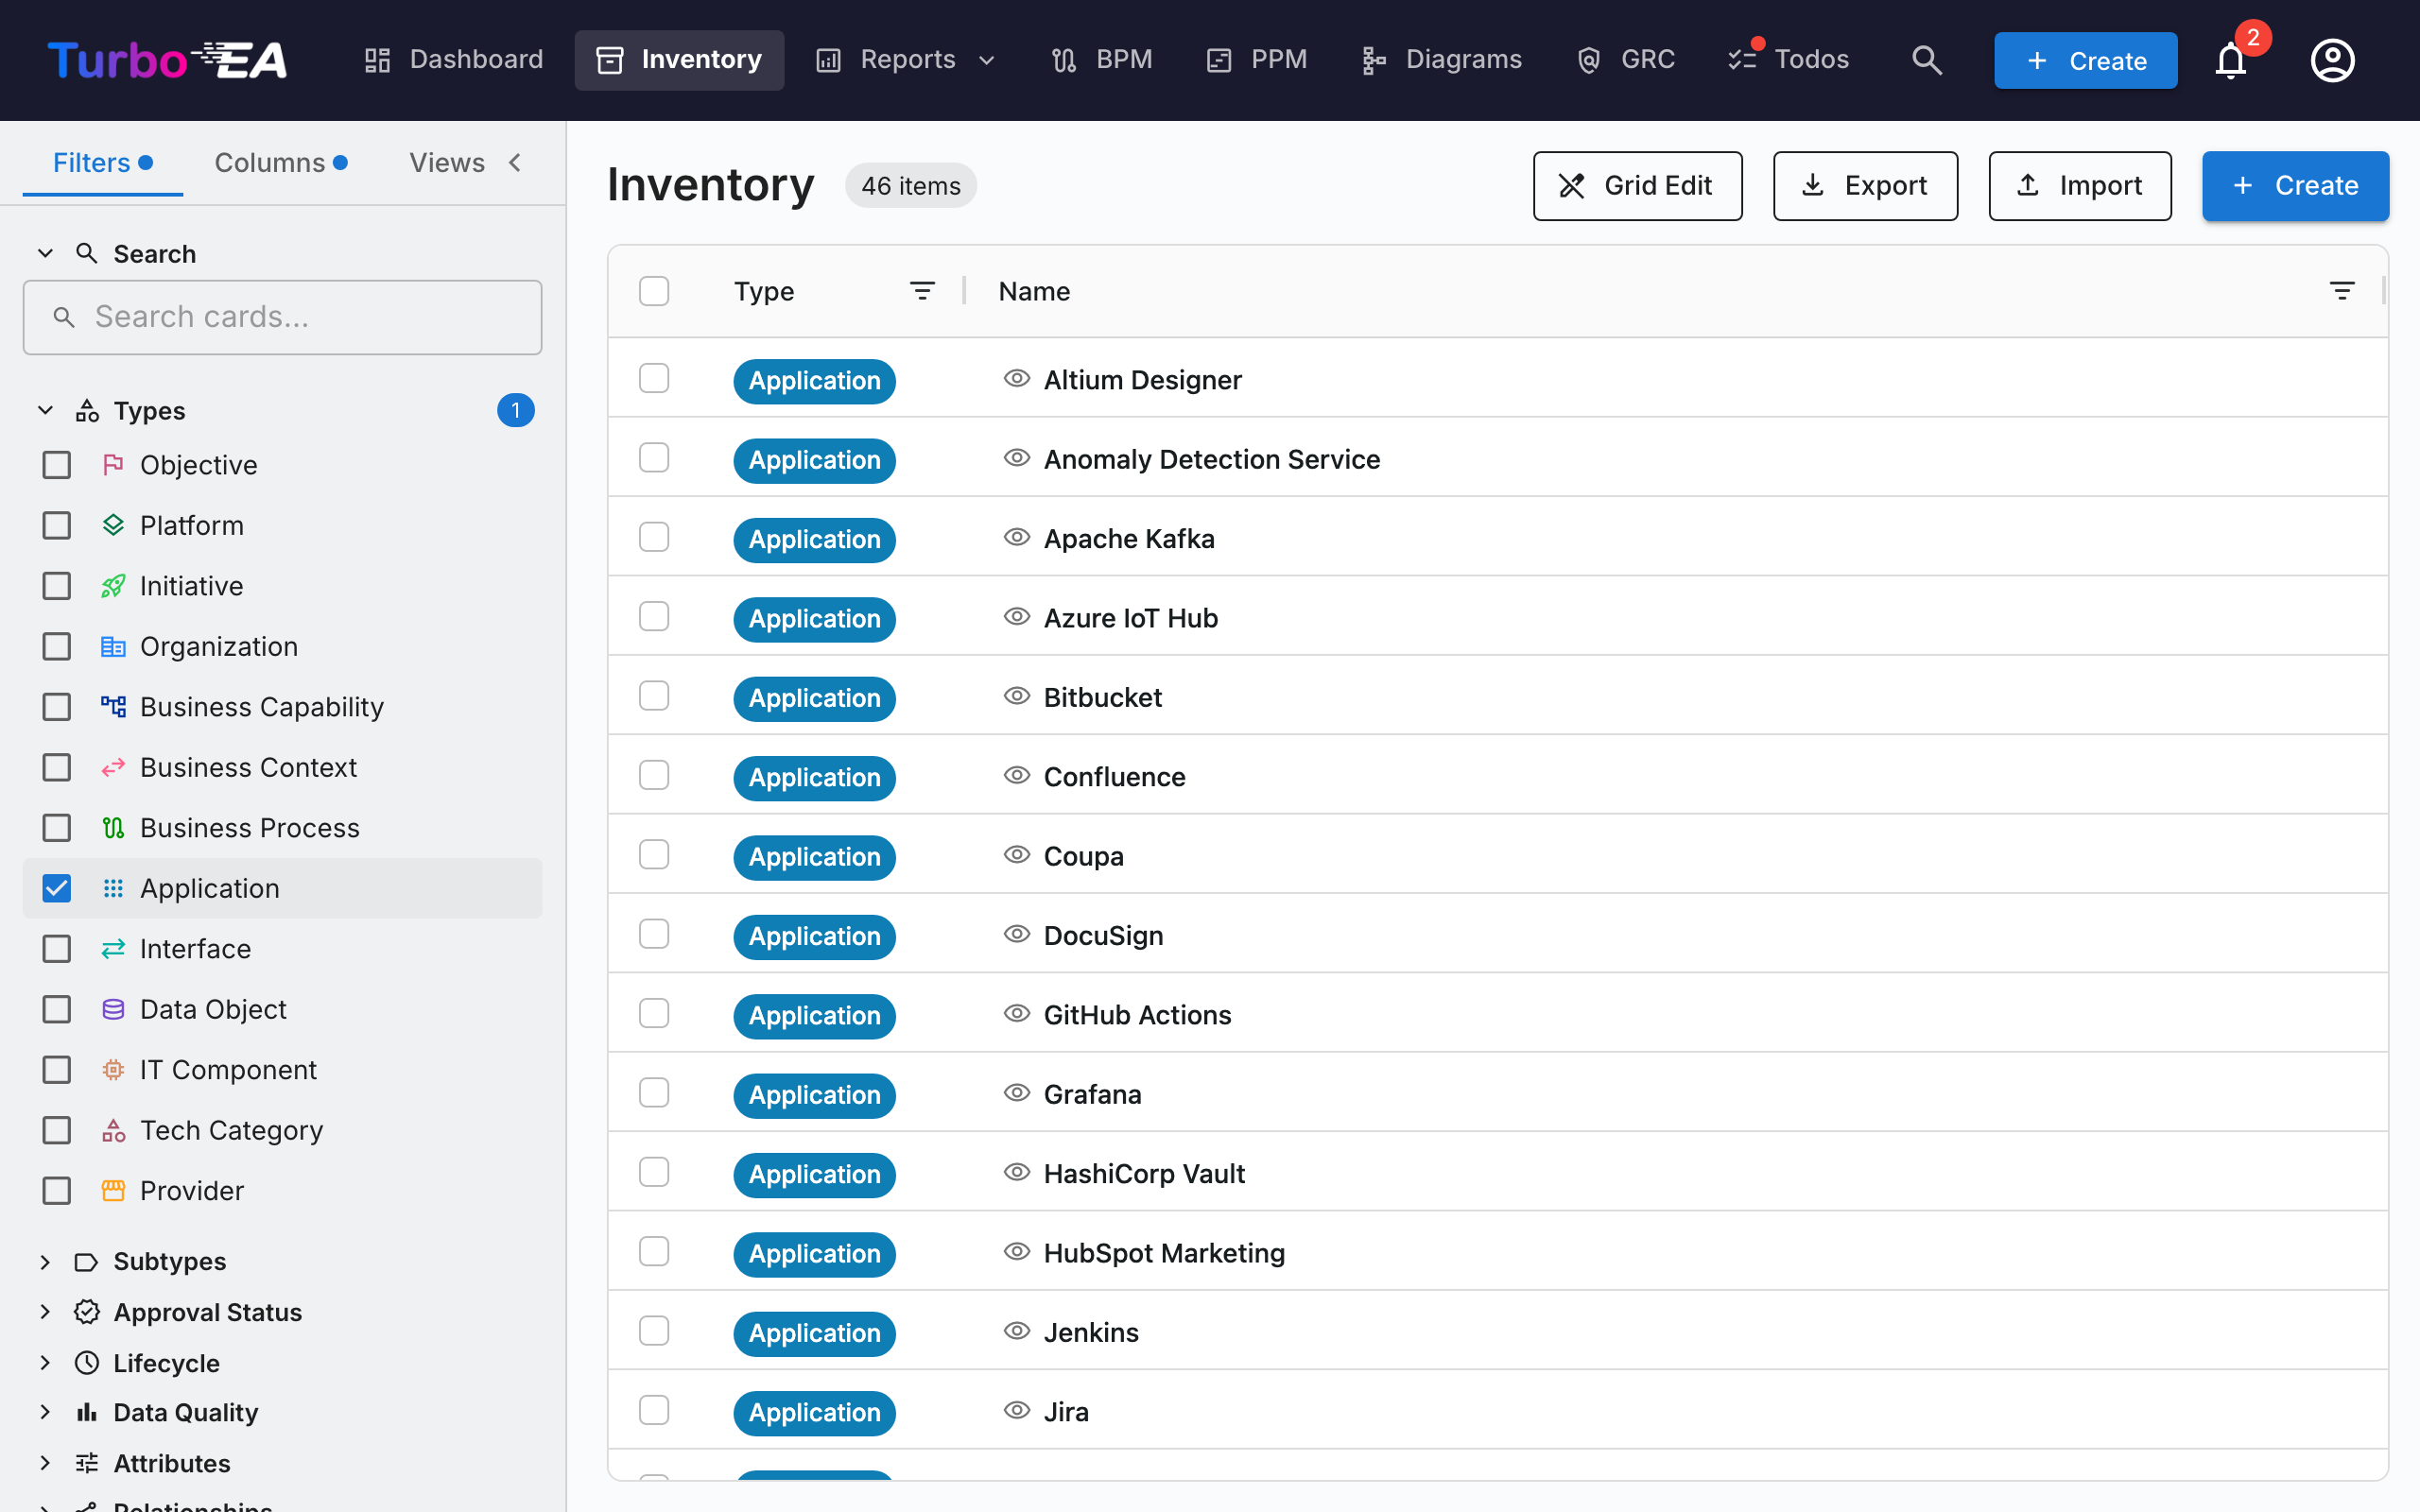
Inventory Screen Structure
Left Filter Panel
The left sidebar panel allows you to filter cards by different criteria:
- Search — Free text search across card names
- Types — Filter by one or more card types: Objective, Platform, Initiative, Organization, Business Capability, Business Context, Business Process, Application, Interface, Data Object, IT Component, Tech Category, Provider, System
- Subtypes — When a type is selected, filter further by subtype (e.g., Application → Business Application, Microservice, AI Agent, Deployment)
- Approval Status — Draft, Approved, Broken, or Rejected
- Lifecycle — Filter by lifecycle phase: Plan, Phase In, Active, Phase Out, End of Life
- Data Quality — Threshold-based filtering: Good (80%+), Medium (50–79%), Poor (below 50%)
- Tags — Filter by tags from any tag group
- Relations — Filter by related cards across relation types
- Custom attributes — Filter by values in custom fields (text search, select options)
- Show archived only — Toggle to view archived (soft-deleted) cards
- Clear all — Reset all active filters at once
An active filter count badge shows how many filters are currently applied.
Columns Tab
The Columns tab in the side panel lets you choose which additional columns to display in the grid. Available columns change dynamically based on the selected card types:
- Single type selected — All attribute fields defined for that type are available, plus relation columns and metadata columns
- Multiple types selected — Only fields that are common across all selected types are available
- No type selected — A hint message prompts you to select a card type first
Columns are grouped into four categories:
| Category | Description |
|---|---|
| Default columns | Always-on columns: Type, Name, Path, Description, Subtype, Lifecycle, Approval Status, Data Quality. Untick any of these to hide them from the grid — useful when tightening a saved view to just the columns you actually use. |
| Metadata | Created, Modified, Created by, Modified by |
| Attributes | Custom fields defined in the metamodel (text, number, cost, date, select, etc.) |
| Relations | Related card types (e.g., Applications linked to a Business Capability) |
The Path column shows the card's hierarchy breadcrumb (e.g. North America / Sales / Inside Sales) without including the card's own name, so you can keep both Name and Path on screen at once.
Each category has a Select all checkbox to quickly toggle all columns in that group. A search field at the top lets you find specific columns by name. The badge on each section header shows how many columns from that group are currently visible.
When a card type is first selected, all attribute and relation columns are enabled by default. You can then uncheck columns you don't need. A Reset button at the bottom of the Columns tab restores the default column selection.
A change indicator dot appears on the Columns tab header when the column selection differs from the defaults. The same indicator appears on the Filters tab when any filters are active, making it easy to see at a glance which settings have been modified.
Your column selection, active filters, and sort order are automatically persisted in your browser. When you return to the inventory page, your previous configuration is restored. Saved views (bookmarks) also preserve the full column selection, so switching between views restores exactly the columns you had configured.
Main Table
The inventory uses an AG Grid data table with powerful features:
| Column | Description |
|---|---|
| Type | Card type with color-coded icon |
| Name | Component name (click to open card detail). Each name cell has a 👁 eye icon — click it to open the card detail in a side panel without leaving the grid. Ctrl/Cmd-click the name to open the card in a new browser tab. |
| Path | Hierarchy breadcrumb up to the card's parent — empty for root cards |
| Description | Brief description |
| Lifecycle | Current lifecycle state |
| Approval Status | Review status badge |
| Data Quality | Completeness percentage with visual ring |
| Relations | Relation counts with clickable popover showing related cards |
Table features:
- Sorting — Click any column header to sort ascending/descending
- Inline editing — In grid edit mode, edit field values directly in the table
- Multi-select — Select multiple rows for bulk operations
- Quick preview — Use the eye icon next to any name to open the card detail in a side panel
- Open in new tab — Ctrl/Cmd-click a name to open the card in a new browser tab; main-nav links also support this
- Column configuration — Show, hide, and reorder columns (including the always-on default columns)
Toolbar
- Grid Edit — Toggle inline editing mode to edit multiple cards in the table
- Export — Download data as an Excel (.xlsx) file
- Import ▾ — Dropdown with two options:
- Spreadsheet (Excel/CSV) — Bulk upload of structured data using the multi-sheet workbook format with relations. See Excel Import / Export below.
- Document (PDF, Word, text) — Extract cards from an unstructured document using your configured AI provider. See Document Import below.
- + Create — Create a new card
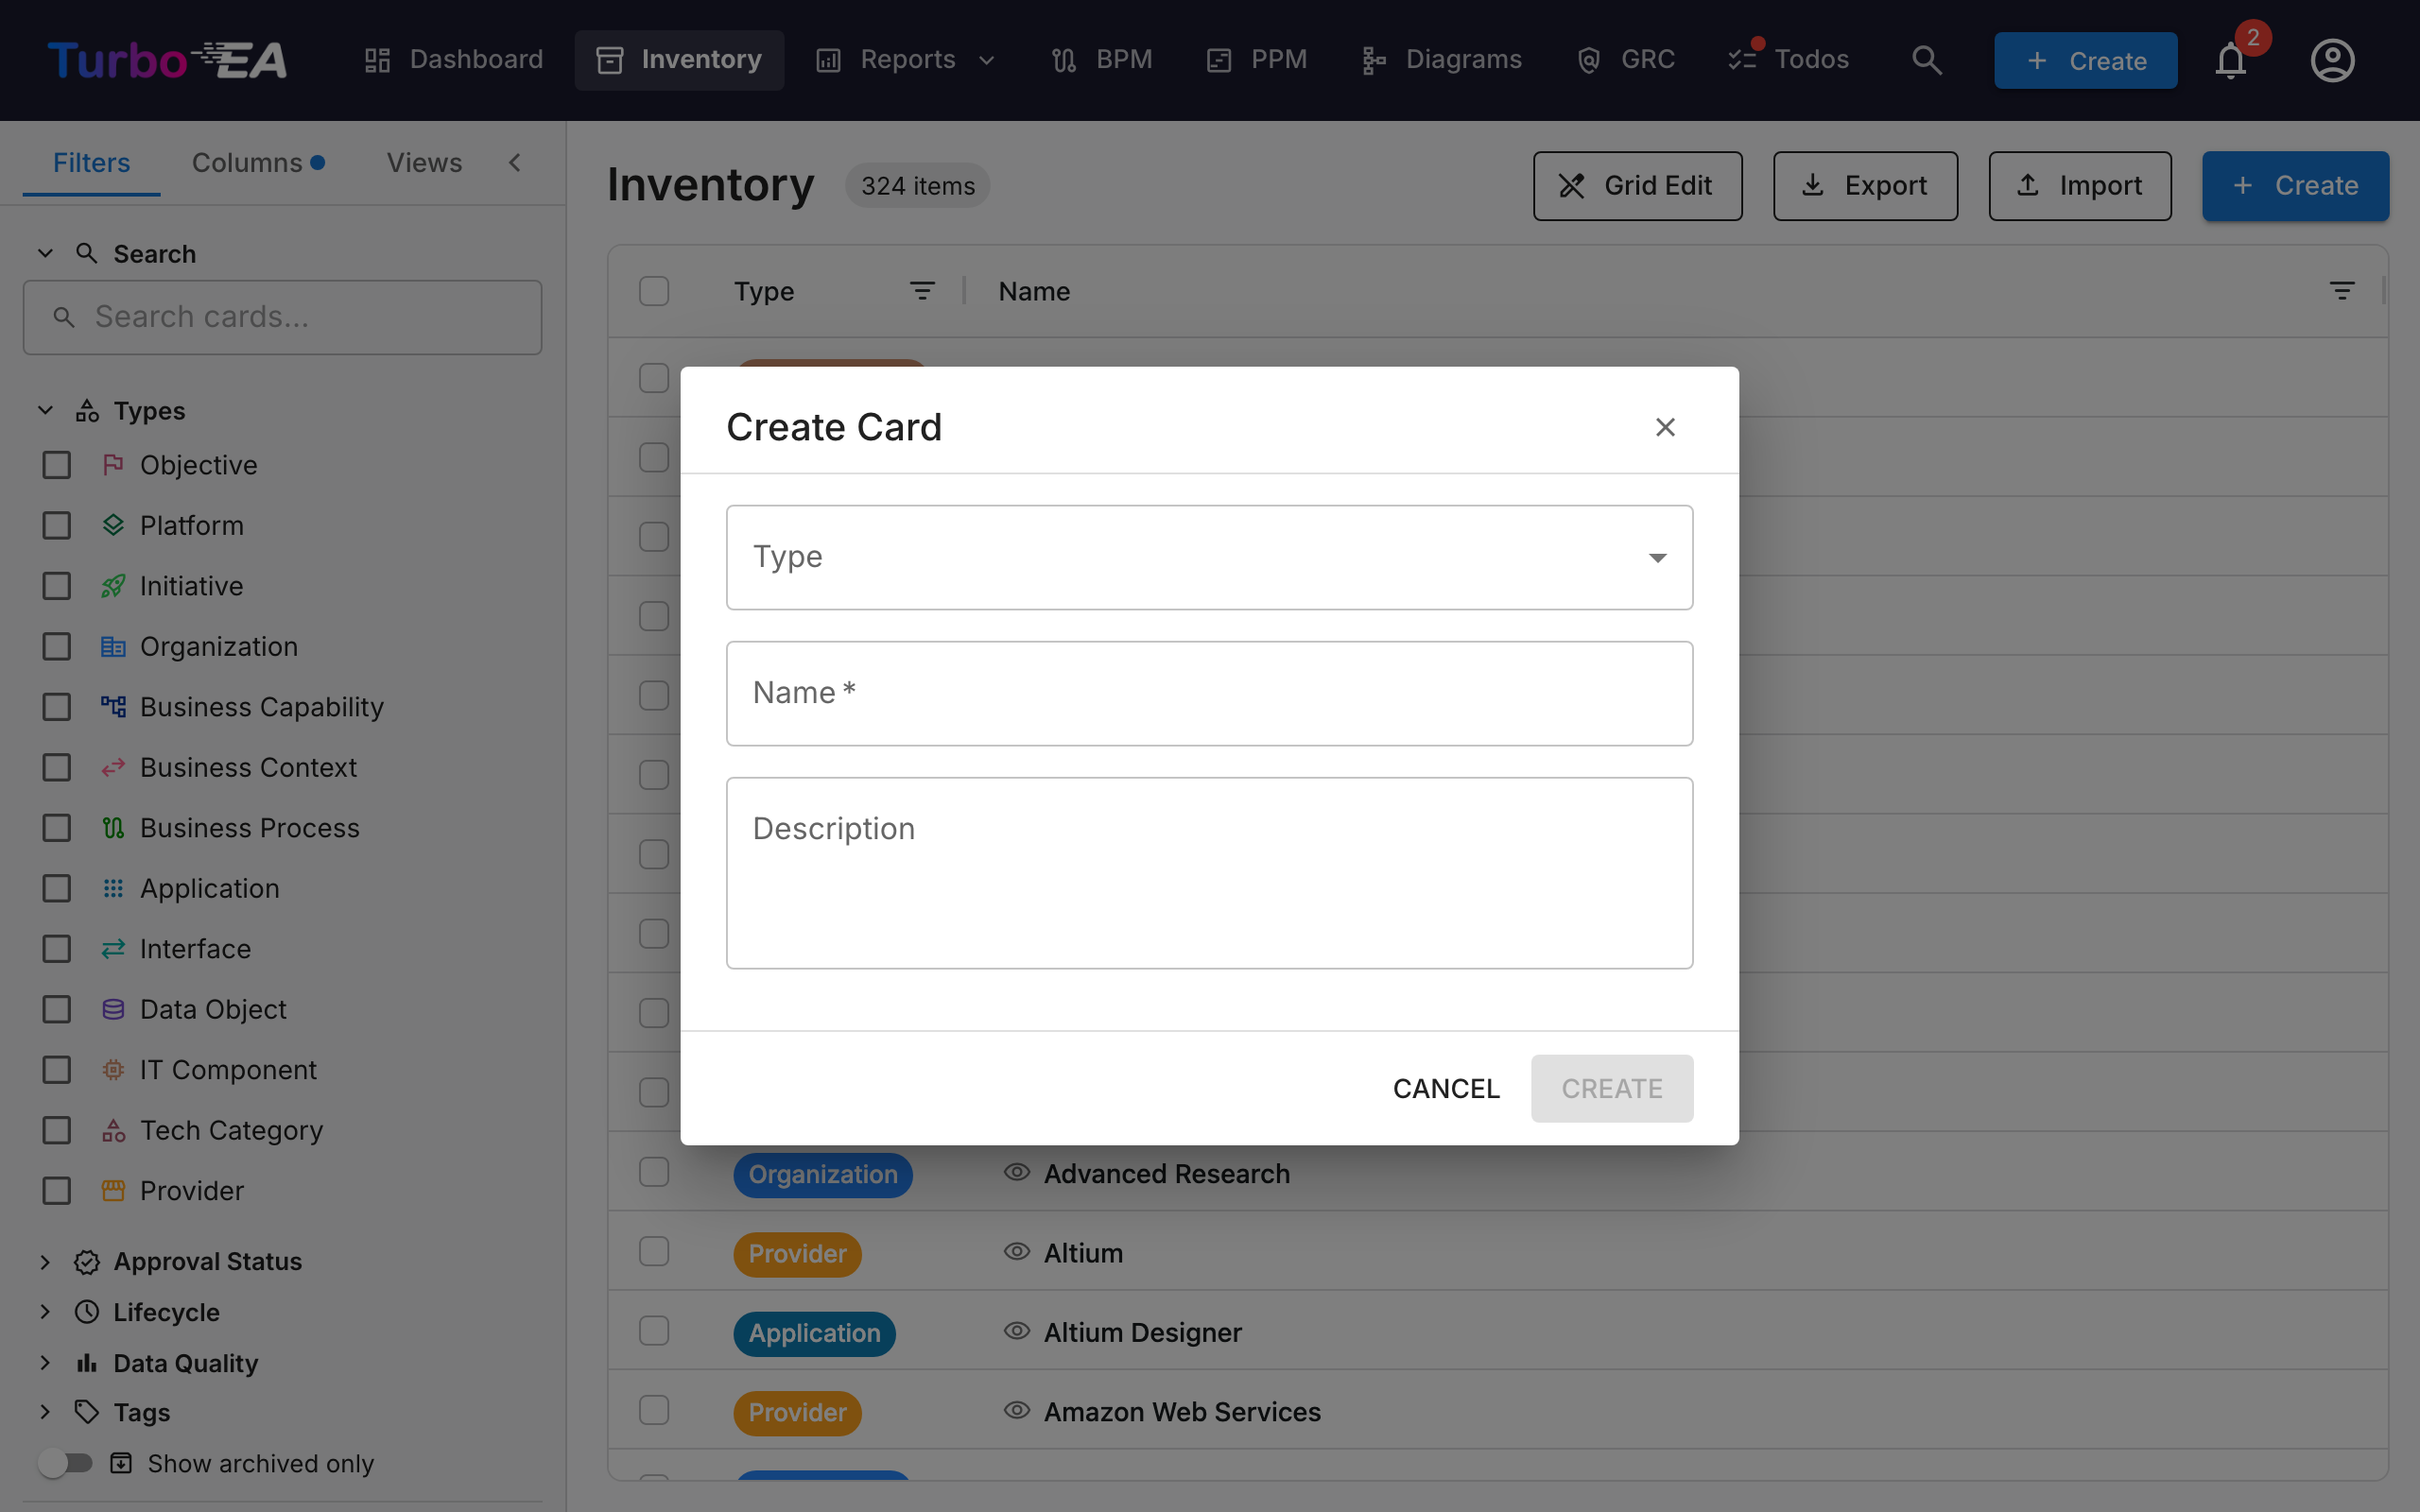
How to Create a New Card
- Click the + Create button (blue, top right corner)
- In the dialog that appears:
- Select the Type of card (Application, Process, Objective, etc.)
- Enter the Name of the component
- Optionally, add a Description
- Optionally, click Suggest with AI to generate a description automatically (see AI Description Suggestions below)
- Click CREATE
AI Description Suggestions
Turbo EA can use AI to generate a description for any card. This works on both the Create Card dialog and existing card detail pages.
How it works:
- Enter a card name and select a type
- Click the sparkle icon in the card header, or the Suggest with AI button in the Create Card dialog
- The system performs a web search for the item name (using type-aware context — e.g., "SAP S/4HANA software application"), then sends the results to an LLM to generate a concise, factual description
- A suggestion panel appears with:
- Editable description — review and modify the text before applying
- Confidence score — indicates how certain the AI is (High / Medium / Low)
- Clickable source links — the web pages the description was derived from
- Model name — which LLM generated the suggestion
- Click Apply description to save, or Dismiss to discard
Key characteristics:
- Type-aware: The AI understands the card type context. An "Application" search adds "software application", a "Provider" search adds "technology vendor", etc.
- Privacy-first: When using Ollama, the LLM runs locally — your data never leaves your infrastructure. Commercial providers (OpenAI, Google Gemini, Anthropic Claude, etc.) are also supported
- Admin-controlled: AI suggestions must be enabled by an administrator in Settings > AI Suggestions. Admins choose which card types show the suggestion button, configure the LLM provider, and select the web search provider
- Permission-based: Only users with the
ai.suggestpermission can use this feature (enabled by default for Admin, BPM Admin, and Member roles)
Saved Views (Bookmarks)
You can save your current filter, column, and sort configuration as a named view for quick reuse.
Creating a Saved View
- Configure the inventory with your desired filters, columns, and sorting
- Click the bookmark icon in the filter panel
- Enter a name for the view
- Choose the visibility:
- Private — Only you can see it
- Shared — Visible to specific users (with optional edit permissions)
- Public — Visible to all users
Using Saved Views
Saved views appear in the filter panel sidebar. Click any view to instantly apply its configuration. Views are organized into:
- My Views — Views you created
- Shared with Me — Views others shared with you
- Public Views — Views available to everyone
Excel Import / Export
Inventory exports and imports use a multi-sheet Excel workbook that round-trips your landscape — cards across any number of types plus the relations between them — without ever requiring you to copy a UUID.
Open this flow from Import ▾ → Spreadsheet (Excel/CSV) in the toolbar.
Workbook layout
A single export produces:
- One sheet per card type present in the export (Application, Business Capability, IT Component, …). Each sheet carries the type's core columns, its custom
attr_<field_key>columns, its lifecycle columns, and itsrel:<relation_type_key>relation columns. - A
Relationssheet for relation types that carry attributes (e.g. cost, description). Simple relations live inline on the card sheet; attribute-bearing relations live here. - A
_Metasheet carrying the workbook format version. The importer reads it to detect older formats and prints a banner.
Identifying cards (no GUIDs needed)
Cards are matched by name when unambiguous within their type, otherwise by their full parent_path. A relation cell can list NexaCore ERP directly when only one Application has that name; if two do, the cell needs Sales / Customer Mgmt / CRM (the same path format the parent_path column uses on the card sheets, with \ and / escapes for names that contain those characters).
The same precedence drives card-update matching: rows with a UUID in the id column update that card; rows without an id are matched by (type, parent_path, name); rows that don't match anything become new cards.
Sibling-name uniqueness
Because cards are identified by name + path, two cards of the same type cannot share both a parent and a name. New cards that would create such a collision are rejected at creation time (in the Create Card dialog, in the inline rename, and during spreadsheet import). Cards already in the database that share a name with a sibling — from earlier seed data or imports — are left untouched; you can edit any of their fields, but renaming one back into the collision (or creating a third) is blocked. The check is case- and whitespace-insensitive to match the importer's resolver.
Inline relation cells
On every card sheet, rel:<relation_type_key> columns let you express outgoing relations as semicolon-separated target references:
rel:supports     →  NexaCore ERP; BillingApp; Salesforce
rel:depends_on   →  Sales / Customer Mgmt / CRM
Semicolons (not commas) separate targets because card names commonly contain , (e.g. Acme, Inc.). Inside a name, / and \ must be escaped as \/ and \\ — the importer reads the cell with the same rules as parent_path, so a name like SAP S/4HANA is written as SAP S\/4HANA. The exporter does this for you automatically; only hand-typed cells need the escapes.
Cells are declarative: the set of targets in the cell becomes the complete set of outgoing relations of that type from that source after import. Removing a target from the list drops that relation; emptying the cell drops them all. Omitting the column entirely (no rel:supports column at all) leaves existing relations untouched.
For backwards compatibility, the importer also accepts comma-separated cells (workbooks exported before this convention). A cell containing any ; is always treated as semicolon-separated.
Relations sheet
For relations that carry attributes (e.g. annual cost on an Application → IT Component link), use the dedicated Relations sheet:
| relation_type | source_ref | target_ref | action | attr_costTotalAnnual | description |
|---|---|---|---|---|---|
| app_to_itc | NexaCore ERP | Oracle Database | upsert | 25000 | Production tier |
| app_to_itc | OldApp | DB | delete |
action defaults to upsert. A row with action = delete removes that specific relation.
Importing
Click Import in the toolbar, drop the workbook, and review the preview before applying. The preview shows:
- Cards to create / update — same as before
- Relations to add / remove — every relation operation queued by the workbook
- Errors and warnings — including ambiguous relation targets (with candidate paths so you can disambiguate)
Errors block the apply. Warnings (e.g. unknown tag, format version mismatch) don't.
Exporting
Click Export in the toolbar. The current grid filter determines the contents:
- Single-type filter active → one card sheet for that type, plus the Relations sheet for any attribute-bearing relations, plus
_Meta. - No filter or multi-type filter → one sheet per type present, plus the Relations sheet, plus
_Meta. The workbook is fully editable and can be re-imported without losing per-type attributes.
Round-trip tips
- Edit the workbook in Excel, save as
.xlsx, re-import. Cards land via(type, parent_path, name)matching even if you didn't keep theidcolumn. - Renaming a card breaks the name-based match. Keep the
idcolumn populated when you plan to rename and re-import in the same workbook. - New cards that reference each other (parent-child or relation source-target) work in either order — the server topologically sorts before applying.
Document Import
Turbo EA can extract cards from unstructured documents — PDFs, Word docs, plain text, or RTF — using your configured AI provider. Useful when onboarding a landscape from a vendor RFP, an architecture report, a wiki export, or any long-form prose that mentions applications, capabilities, processes, data objects, or IT components by name.
Open this flow from Import ▾ → Document (PDF, Word, text) in the toolbar.
How it works
Drop the file (or click to browse) and the dialog shows three sections after analysis:
- Existing matches — Cards already in your landscape that the system recognised in the document, each shown with a confidence percentage. When several variants of the same name resolve to the same card (e.g. "NexaCore", "NexaCore ERP", "Nexa Core platform"), they collapse to a single row — the displayed match text is the variant with the highest confidence.
- Suggested cards — New cards the document mentions but that don't exist yet. Each comes with a checkbox (ticked by default), the type the AI inferred (Application, BusinessCapability, BusinessProcess, …), a count of how often the document references it, and optionally:
- A lifecycle chip showing the inferred phase and date (e.g.
active · 2023-06-01). If the document mentions a lifecycle state but no date, the import date (today) is used. - A description preview — a one- or two-sentence summary of what the document says about the entity, shown in italics.
- A lifecycle chip showing the inferred phase and date (e.g.
- Proposed relations — Relationships the AI identified between discovered entities. Each row shows the direction (
Source — label → Target) with a checkbox. A relation is automatically greyed out if either endpoint card is unticked above — select both cards to re-enable it.
Untick anything you don't want, then click Import N selected. The standard Create Card dialog opens for each remaining suggestion one by one, pre-populated with the AI's name, type, description, and lifecycle. You can adjust everything before saving. Cancelling a step skips that suggestion; once all cards are created, any enabled relations are created automatically, and you return to the inventory grid.
Analysis mode
A small badge on the file name tells you which extractor ran:
- AI-analysed — Your configured LLM provider extracted candidates and resolved them against existing cards. Two LLM calls per import in the common case (one for extraction, one for resolution).
- Pattern-analysed — The built-in regex extractor ran instead. Triggered when:
- AI is disabled in admin settings, or
- The AI call fails mid-extraction (the response gracefully falls back so you always get something), or
- More than 2 000 active cards exist in your landscape (the AI resolver soft-cap;
difflibfuzzy matching takes over so prompts stay bounded).
If AI is enabled but misconfigured (empty model id, or missing API key for a commercial provider) the dialog returns a red error matching the behaviour of AI Description Suggestions. Fix the model / key in Admin → Settings → AI and try again.
Large documents
Documents large enough to need multiple LLM calls (≥ 30 KB of extracted text per chunk) trigger a confirmation step before any provider call is made. The dialog warns you with the chunk count and the rough number of calls; click Continue to proceed or Cancel to abort without spending tokens.
Supported formats
| Format | Extension | Notes |
|---|---|---|
.pdf |
Text-extractable PDFs; scanned-image PDFs return no text | |
| Word | .docx, .doc |
Body paragraphs are read; embedded tables and headers may be skipped |
| Plain text | .txt |
UTF-8 |
| Rich text | .rtf |
Decoded as UTF-8 |
Maximum file size: 10 MB.
Permissions
The Document option appears in the Import menu for users with the documents.view permission. The actual AI extraction uses the same provider config as AI Description Suggestions and is gated by the same admin settings — see AI Description Suggestions above for the provider and model setup.